🔥 Firebase Setup for a School
Every school's app needs Firebase for push notifications. This page explains, step by step, how to give a school its own Firebase project: where each Firebase file comes from, and where each one goes.
Allow about 15 minutes per school. You need a Google account, and the school's Android package ID and iOS bundle ID.
📋 The Three Files at a Glance
You download three files from the school's Firebase project. Two go into the app, and one goes into the school's admin panel:
| File | What it is | Where you get it in Firebase | Where it goes |
|---|---|---|---|
google-services.json | The Android app's Firebase settings | Project settings → General → Your apps → the Android app | Dedicated School Mobile App builder: the school's Firebase section, Android |
GoogleService-Info.plist | The iOS app's Firebase settings | Project settings → General → Your apps → the iOS app | Dedicated School Mobile App builder: the school's Firebase section, iOS |
Service account file, for example your-project-firebase-adminsdk-xxxxx.json | The private key the admin panel uses to send notifications | Project settings → Service accounts → Generate new private key | The school's admin panel: Settings → System settings → Notification settings |
You also copy one value, the Project ID, from Project settings → General into the same admin panel page.
A notification only reaches an app that is registered in the same Firebase project as the service account file that sends it. If the app's files come from one project and the admin panel's file from another, the app installs and runs, but no notification ever arrives.
🤔 Do You Need a Separate Project?
A school can use your default Firebase project or its own project. Choose one before you start:
| Your default Firebase project | The school's own Firebase project | |
|---|---|---|
| What it is | The project your default app and the Super Admin panel already use. | A new project, only for this school. |
| When to choose it | You manage all schools yourself and want one place for everything. | The school wants its own Firebase project, or its own notification reports. |
| Steps on this page | Skip Step 1 and Step 5. Add the school's apps to your default project in Steps 2 to 4. | Follow every step. |
| Admin panel | Nothing to change. The school uses the default configuration. | Enter the school's project in its Notification settings. |
The rest of this page sets up the school's own project. The example school is Greenwood International School, with the package ID and bundle ID com.wrteam.eschool.greenwoodinternationalschool.
✅ Before You Start
- Finish the Super Admin setup of the add-on. See the setup order.
- Know the school's IDs. Use exactly the Android package id and iOS bundle id you enter for the school in the builder. See Add a School.
Firebase links each file to one package ID or bundle ID. Choose the IDs first and don't change them afterwards. A single different letter means the Firebase file doesn't belong to the app, and the Android build stops with "No matching client found for package name".
Step 1: Create the Firebase Project
- Open the Firebase console and sign in with your Google account.
- Click Create a project (on some accounts, Add project).
- Enter the school's name as the project name, for example
Greenwood International School, and click Continue. - Google Analytics is optional, and the app doesn't need it. Choose either option and click Continue.
- Click Create project. When Firebase says the project is ready, click Continue.
You are now on the project's Project Overview page.
Firebase also gives the project a Project ID, such as greenwood-1a2b3. You need it in Step 5. If you rename the project later, its Project ID stays the same.
Step 2: Add the Android App and Download google-services.json
🎬 Watch it first (36 seconds: add the Android app, download google-services.json, and find it again in Project settings):
-
On Project Overview, click + Add app:

-
Choose the Android icon:

-
In Android package name, enter the school's Android package id exactly as it is in the builder, for example
com.wrteam.eschool.greenwoodinternationalschool. The App nickname is optional. Click Register app.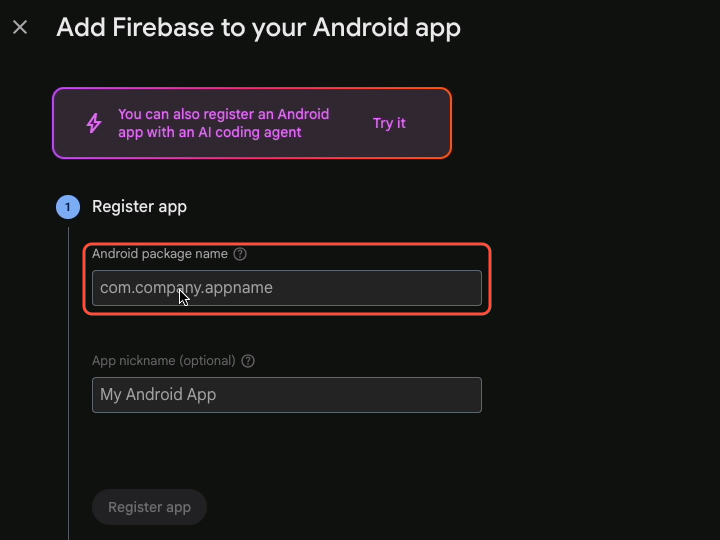
-
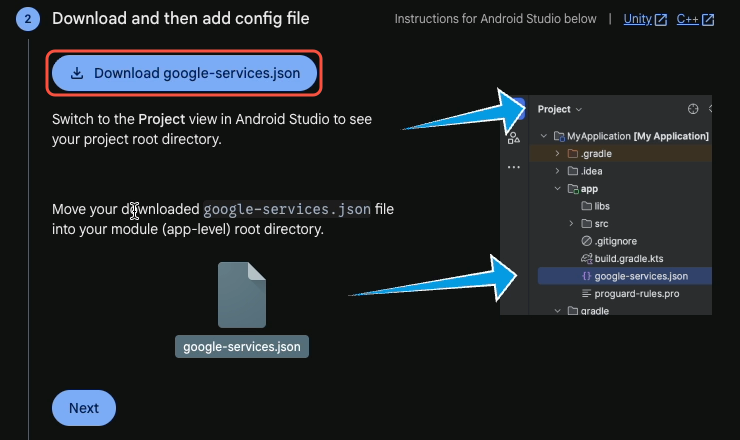
Click Download google-services.json. The file goes to your Downloads folder.
-
Click Next on the remaining steps, then Continue to console.
Firebase tells you to move the file into Android Studio and to add the Firebase SDK and Gradle plugin. Don't do this. The eSchool SaaS app already includes the SDK, and the builder puts the file in the right place for each school's build. You only need the downloaded file.
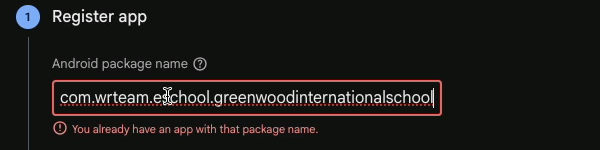
This means the Android app is already registered in this project. Don't change the package name to get past the message: an app with a different name doesn't belong to your school's app. Close the window and download the existing app's file instead, as shown in Where to Find the Files Later.
Step 3: Add the iOS App and Download GoogleService-Info.plist
Skip this step if you build the school's app for Android only.
- Go back to Project Overview and click + Add app again. This time choose the iOS (Apple) icon.
- In Apple bundle ID, enter the school's iOS bundle id exactly as it is in the builder. The App nickname and App Store ID are optional. Click Register app.
- Click Download GoogleService-Info.plist.
- Click Next on the remaining steps, then Continue to console. Skip Firebase's instructions about Xcode and the SDK: the builder handles them, as for Android.
Apple delivers iOS notifications only when the Firebase project has your APNs Authentication Key (.p8). Upload it in Project settings → Cloud Messaging → Apple app configuration. Each school's own project needs the key uploaded once. You can upload the same .p8 key to every project that uses your Apple Developer account. See Push Notification Setup.
Where to Find the Files Later
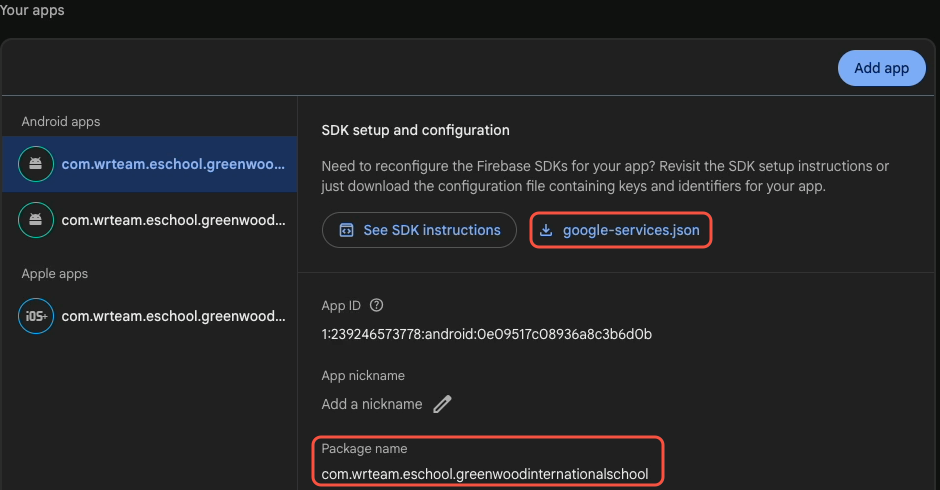
You can download both app files again at any time, for example when you set up a new computer:
- In the left menu, click Settings (the gear icon) → General.
- Scroll down to Your apps.
- Click the app under Android apps or Apple apps.
- Click google-services.json or GoogleService-Info.plist.
Check the Package name (Android) or Bundle ID (iOS) shown for the app. It must be the school's ID.
Step 4: Add the Two App Files to the Dedicated School Mobile App Builder
-
Start the builder:
.\build.cmdon Windows,./build.shon macOS. See Install the Add-on. -
In the Schools tab, click Edit on the school, or Add school for a new one.
-
Open the Firebase section:
- Under Android · google-services.json, click Choose file… and select the downloaded
google-services.json. - Under iOS · GoogleService-Info.plist, click Choose file… and select the downloaded
GoogleService-Info.plist.
You can also drag each file onto its box.
- Under Android · google-services.json, click Choose file… and select the downloaded
-
Check the Firebase project line under each file. Both must show the same project.
-
Click Save.
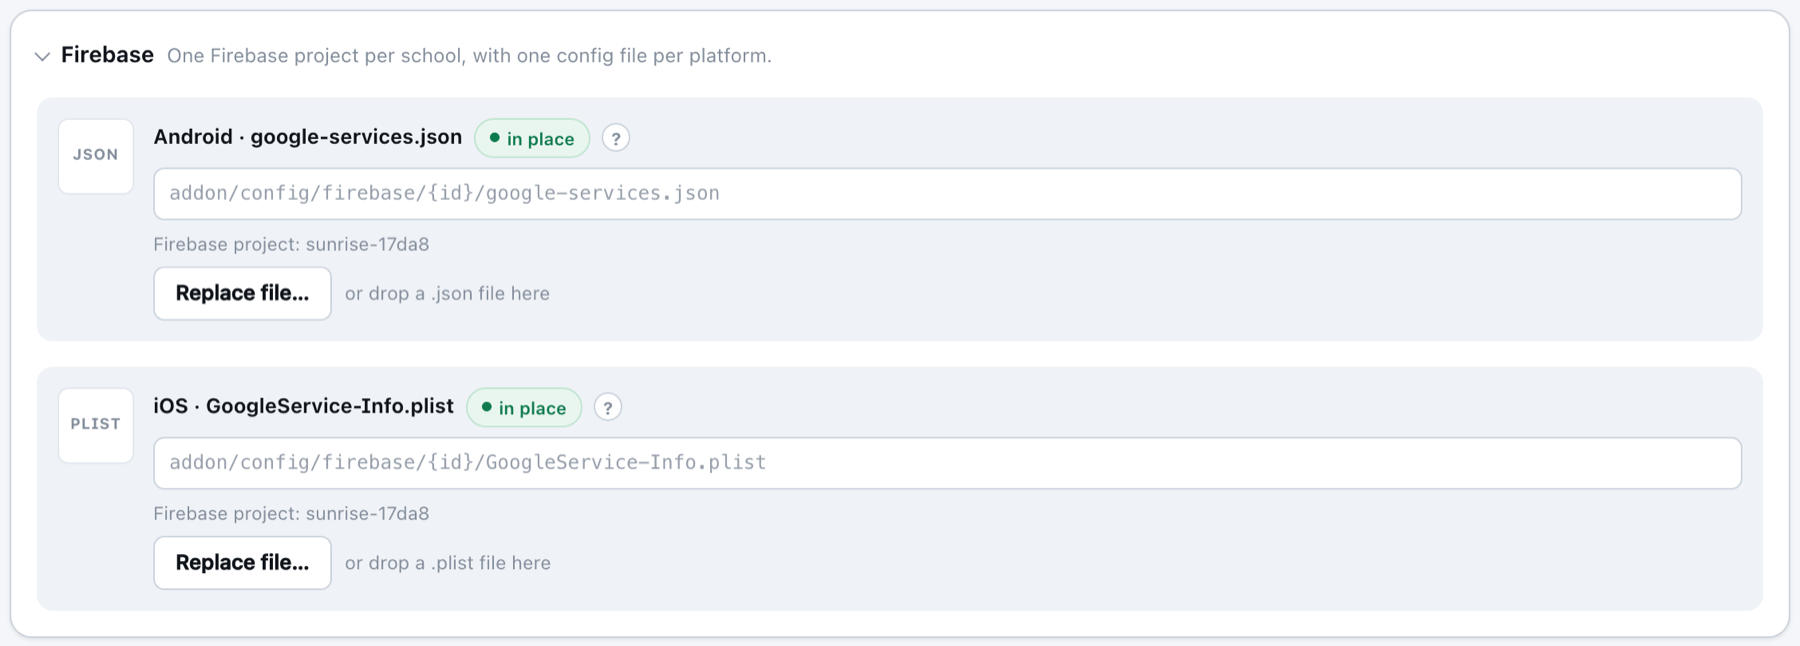
The builder copies both files into the school's own folder, so you can delete the downloaded copies afterwards:
addon/config/firebase/<school-id>/
├── google-services.json        ← Android
└── GoogleService-Info.plist    ← iOS
You can also copy the two files into that folder yourself. Use the exact file names above, and the school's ID as the folder name. Then run .\build.cmd --firebase or ./build.sh --firebase to list each school's Firebase project.
The addon/config/firebase/ folder and the builder are only for google-services.json and GoogleService-Info.plist. The service account file from Step 5 is a private key: it goes only into the admin panel.
Step 5: Connect the Project in the School's Admin Panel
The app files let the app receive notifications. The admin panel also needs this project's private key to send them.
5.1 Copy the Project ID
In Firebase, open Settings → General and copy the Project ID:
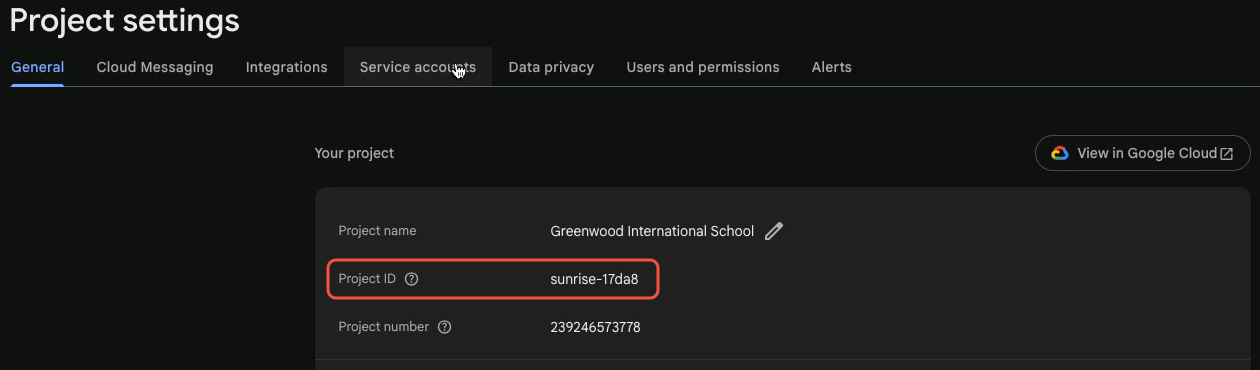
5.2 Download the service account file
🎬 Watch it first (19 seconds: find the Project ID and generate the service account file):
-
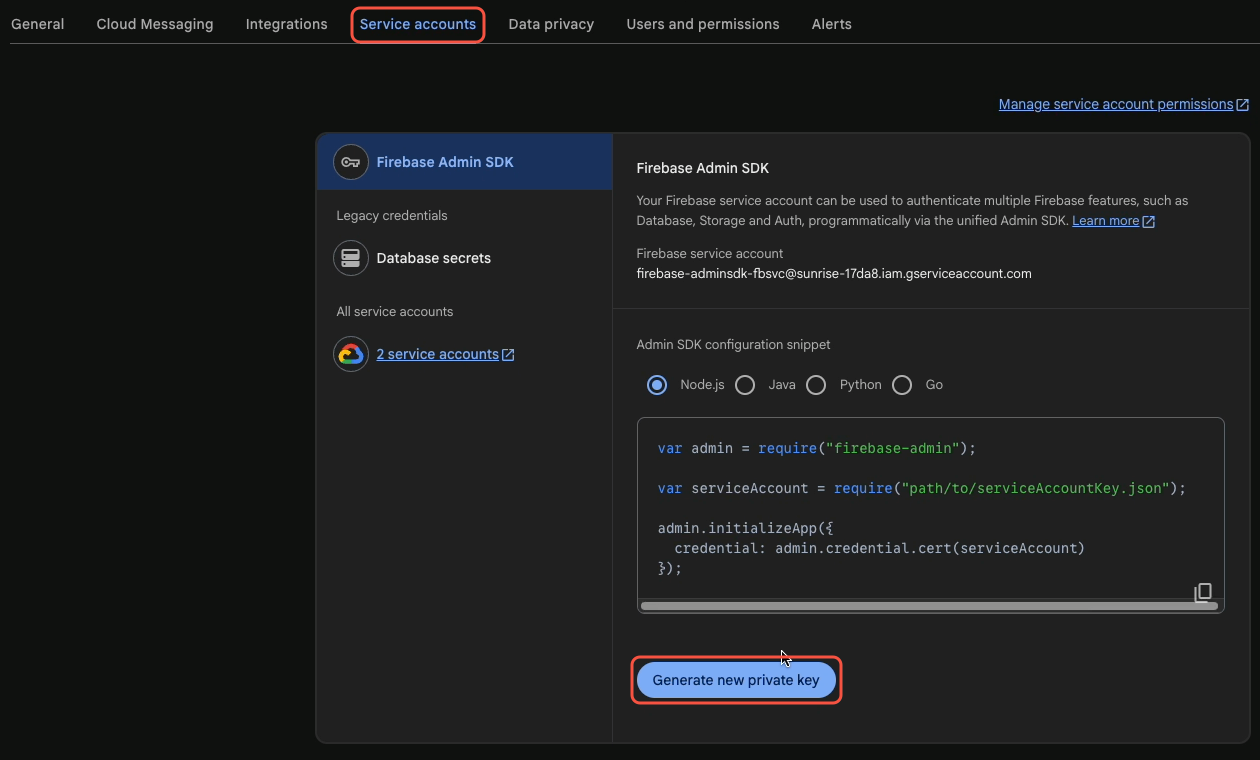
Open the Service accounts tab.
-
Make sure Firebase Admin SDK is selected on the left, and click Generate new private key:
-
Read the warning and click Generate key. A
.jsonfile named likeyour-project-id-firebase-adminsdk-xxxxx.jsondownloads.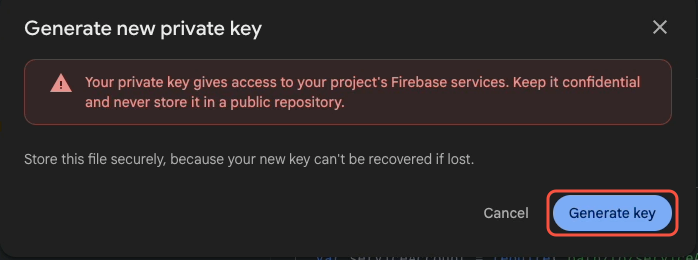
The service account file gives full access to the Firebase project. Don't email it, share it in chat, add it to the app or commit it to Git. Firebase can't show it to you again: if you lose it, generate a new key. If it may have been shared, delete that key in Manage service account permissions (Google Cloud) and generate a new one.
5.3 Enter both in the admin panel
- Log in to the school's admin panel.
- Go to Settings → System settings → Notification settings.
- In Firebase project ID, paste the Project ID from 5.1.
- Next to Firebase service file, click Upload and choose the service account file from 5.2. Only
.jsonfiles are accepted. - Click Submit.
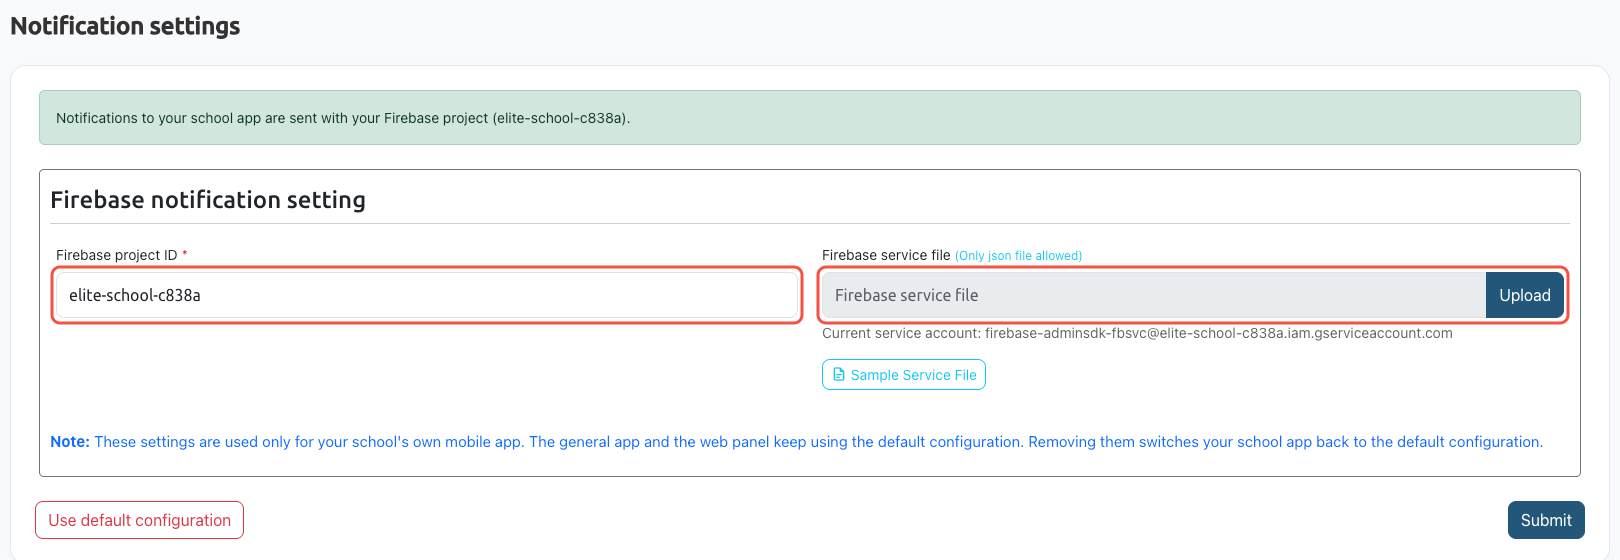
When the setting is saved, the green message at the top of the page names the school's project: "Notifications to your school app are sent with your Firebase project (…)". Current service account shows the account from the uploaded file. Its address ends with @<project-id>.iam.gserviceaccount.com, so you can check that it's the right project.
It applies only to the school's own mobile app, the one you build for it with this add-on. The general app and the web panel keep using the default configuration from the Super Admin panel.
Use default configuration removes the school's own project, and the school's app goes back to the default configuration. Do this only if the school's app is registered in your default Firebase project; otherwise its notifications stop.
Step 6: Build and Test
- Build the school's app in the builder. See Generate the APK.
- Install the app on a phone, log in, and allow notifications when the app asks.
- From the school's admin panel, send a notification, for example a new announcement, to that user.
- The notification should arrive within a minute. If it doesn't, see Troubleshooting.
✅ Checklist
- One Firebase project for the school, with its Android app (and iOS app for iOS builds)
- The package name and bundle ID in Firebase are exactly the school's IDs in the builder
-
google-services.jsonandGoogleService-Info.plistare in the builder's Firebase section, and both show the same project - (iOS) The APNs key is uploaded in Cloud Messaging
- The school's Notification settings have the same project's Project ID and service account file
- A test notification arrived on a phone
🛠️ Troubleshooting
| Problem | Cause | What to do |
|---|---|---|
| The Android build stops with "No matching client found for package name '…'" | The school's google-services.json doesn't contain its package ID: it was downloaded for another app, or the package ID in Firebase is different. | In Firebase, add (or check) the Android app with exactly the school's package ID. Download google-services.json again and choose it in the builder. |
| Firebase says "You already have an app with that package name" | The app is already registered in this project. | Don't register it again. Download its file from Settings → General → Your apps. |
Firebase project mismatch between platforms | The Android and iOS files come from different projects. | Download both files from the same project. |
| The app works, but notifications never arrive | The admin panel uses a different Firebase project from the app's files, or still uses the default configuration. | Compare the project in the green message on Notification settings with the Firebase project line in the builder. They must be the same. Fix whichever is wrong, then build and install the app again if you changed its files. |
| Notifications arrive on Android but not on iOS | The APNs key isn't uploaded in this project. | Upload the .p8 key in Cloud Messaging → Apple app configuration. See Push Notification Setup. |
| You registered a wrong package name by mistake | A typo in Register app. | In Settings → General → Your apps, select the wrong app, scroll to the bottom and click Remove this app. Then register the correct one. |
| Notification settings in the school's admin panel has no Firebase fields | The admin panel is older than this feature. | Update the admin panel to the latest version. |
For other builder messages, see Troubleshooting & FAQ.
Next: Add a School, or Generate the APK if the school is already added.