📦 Install the Add-on
This page explains what you receive after purchasing the Dedicated School Mobile App add-on and how to add it to your eSchool SaaS app project on Windows or macOS. Installation takes about five minutes.
Before you install the add-on in the app project, purchase it, add its files to the Super Admin panel and complete its setup there. The Dedicated School Mobile App guide for the Super Admin panel explains each step. Start the steps on this page only after that setup has finished successfully. See the setup order.
Where the steps differ, pick Windows or macOS in the tabs. Every page in this section follows your choice.
📥 What You Receive
After purchase, you download a zip file named like school-builder-1.0.0.zip. It contains a single folder, school-builder:
school-builder/
├── addon/                              ← the add-on folder
│   ├── build.sh                        ← the builder (macOS)
│   ├── build.cmd                       ← the builder (Windows)
│   ├── addon.json                      ← add-on name and version
│   ├── README.md
│   ├── docs/MULTI_SCHOOL_BUILD.md      ← full technical reference
│   ├── templates/schools.example.json  ← example school list
│   ├── tools/                          ← builder scripts and browser page
│   └── config/
│       ├── firebase/README.md
│       └── signing/                    ← README and a sample key.properties
├── build.sh                            ← shortcut to the builder (macOS)
└── build.cmd                           ← shortcut to the builder (Windows)
| Item | Purpose |
|---|---|
addon/ | The builder itself. This is the add-on folder. |
build.cmd / build.sh | Start the builder from the project root: .\build.cmd on Windows, ./build.sh on macOS. |
The same zip works for the Student/Parent app and the Staff/Teacher app. Install it into each project you want to build schools for. The add-on reads each app's own colours and notification icon from that project, so nothing has to be changed for either app.
The add-on needs app code v1.12.0 or later, which already contains everything else it uses. On older code it stops and asks you to update first.
The zip contains no schools, Firebase files or signing keys. These are created on your computer inside addon/config/ and addon/assets/schools/, so installing a future update never overwrites them.
🛠️ Installation Steps
Step 1: Prepare your computer
- Windows
- macOS
- Make sure the app already builds:
flutter doctorshows no Android errors, andflutter build apkworks in the project. - Install Python 3.8 or later from python.org. In the installer, tick Add python.exe to PATH.
- Close and reopen your terminal, then check the installation:
py -3 --version
- Make sure the app already builds:
flutter doctorshows no errors for the platforms you need. - Python 3 comes with the Xcode Command Line Tools. If
python3 --versiondoesn't work, run:
xcode-select --install
Then back up your project: commit your work to Git, or make a copy of the project folder.
Step 2: Copy the add-on into your project
- Extract
school-builder-1.0.0.zip. - Open the extracted
school-builderfolder. - Copy everything inside it into your app's project root, the folder that contains
pubspec.yaml. If you're asked, choose Replace (Windows) or Merge (macOS).
The addon folder must sit directly in the project root, next to lib and pubspec.yaml. The path should be e-school-saas\addon\, not e-school-saas\school-builder\addon\.
If you prefer the terminal, run these commands from your project root. Replace the version number with the one you downloaded.
- Windows
- macOS
cd C:\path\to\e-school-saas                    # the folder that contains pubspec.yaml
Expand-Archive "$HOME\Downloads\school-builder-1.0.0.zip" -DestinationPath "$HOME\Downloads" -Force
Copy-Item -Recurse -Force "$HOME\Downloads\school-builder\*" .
cd /path/to/e-school-saas                      # the folder that contains pubspec.yaml
unzip ~/Downloads/school-builder-1.0.0.zip -d ~/Downloads/
cp -R ~/Downloads/school-builder/. .
chmod +x build.sh addon/build.sh
Your project root now looks like this:
e-school-saas/
├── addon/          ← new
├── android/
├── assets/
├── ios/
├── lib/
├── build.cmd       ← new
├── build.sh        ← new or updated
└── pubspec.yaml
Step 3: Open the builder
In a terminal, from the project root, run:
- Windows
- macOS
.\build.cmd
This works in both PowerShell and Command Prompt. In Command Prompt you can also type just build.cmd.
./build.sh
The builder opens in your default browser. There is nothing to choose first. The terminal also shows the page's link, in case the browser doesn't open by itself:
  School Builder
  http://127.0.0.1:8787/?t=AvqWlDbuqjMQ8hN6qcVELwf_oPQ9k-a2

  The link carries a one-time token; it changes every start.
  Press Ctrl-C to stop the server.
Everything else happens in that page. On a new installation, the Schools tab already lists your default app as the Default School, which you can edit straight away. Click Add school for your first school:
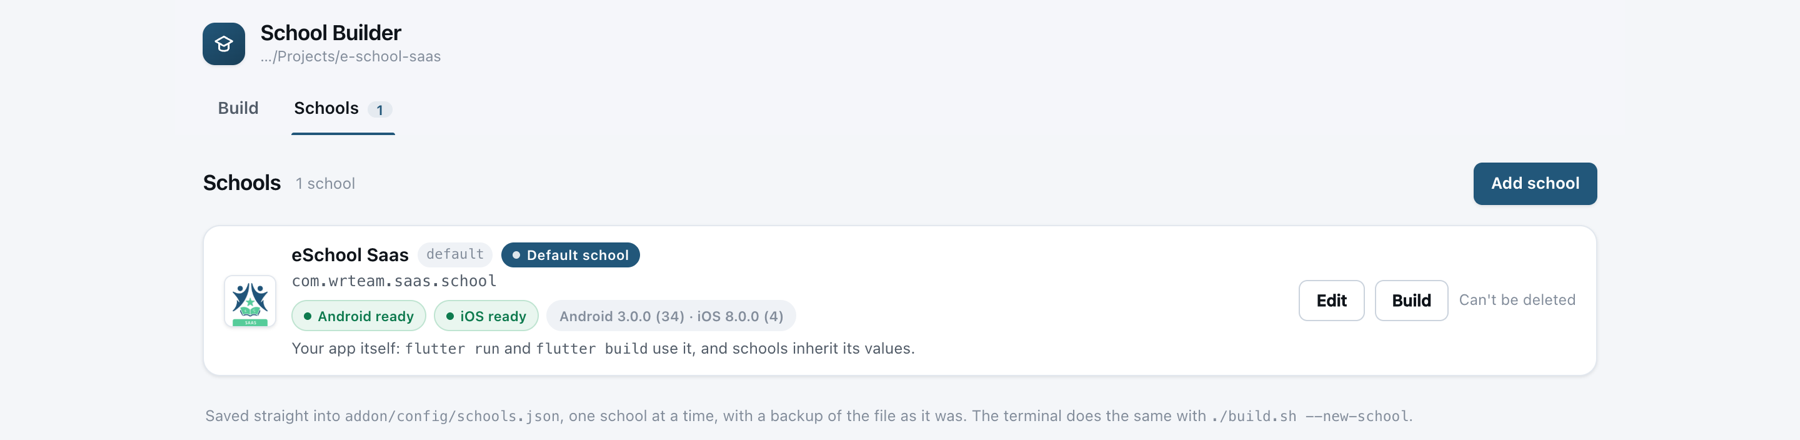
The browser page is served from the terminal window. Keep that window open while you use the builder, and press Ctrl + C to close the builder when you're done. The page only runs on your own computer (127.0.0.1) and uses a private link that changes each time you start it.
Step 4 (optional): Turn on the Git safety check
If your project uses Git, run this once from the project root:
- Windows
- macOS
Copy-Item addon\tools\pre-commit .git\hooks\pre-commit
ln -sf ../../addon/tools/pre-commit .git/hooks/pre-commit
This blocks a commit while a school's settings are applied to the project, so one school's icon or Firebase files can never be committed by mistake.
✅ Verify the Installation
- Windows
- macOS
.\build.cmd --help
./build.sh --help
If you see a list of commands, the add-on is installed. If you see "The School Builder addon is not installed", the addon folder is not in the project root. Repeat Step 2.
Next: Firebase Setup for a School, then Add a School.
🔄 Updating the Add-on
When a new version is released, replace only the builder. Your schools, Firebase files and signing keys stay untouched.
- Windows
- macOS
# 1. Remove the old builder files (your data folders are not touched)
Remove-Item -Recurse -Force addon\tools, addon\docs, addon\templates
Remove-Item -Force addon\build.sh, addon\build.cmd, addon\addon.json

# 2. Copy the contents of the new school-builder folder into the project root, as in Step 2

# To check which version you have installed:
Get-Content addon\addon.json
# 1. Remove the old builder files (your data folders are not touched)
rm -rf addon/tools addon/docs addon/templates
rm -f  addon/build.sh addon/build.cmd addon/addon.json

# 2. Copy the contents of the new school-builder folder into the project root, as in Step 2

# To check which version you have installed:
cat addon/addon.json