Timetable Setup
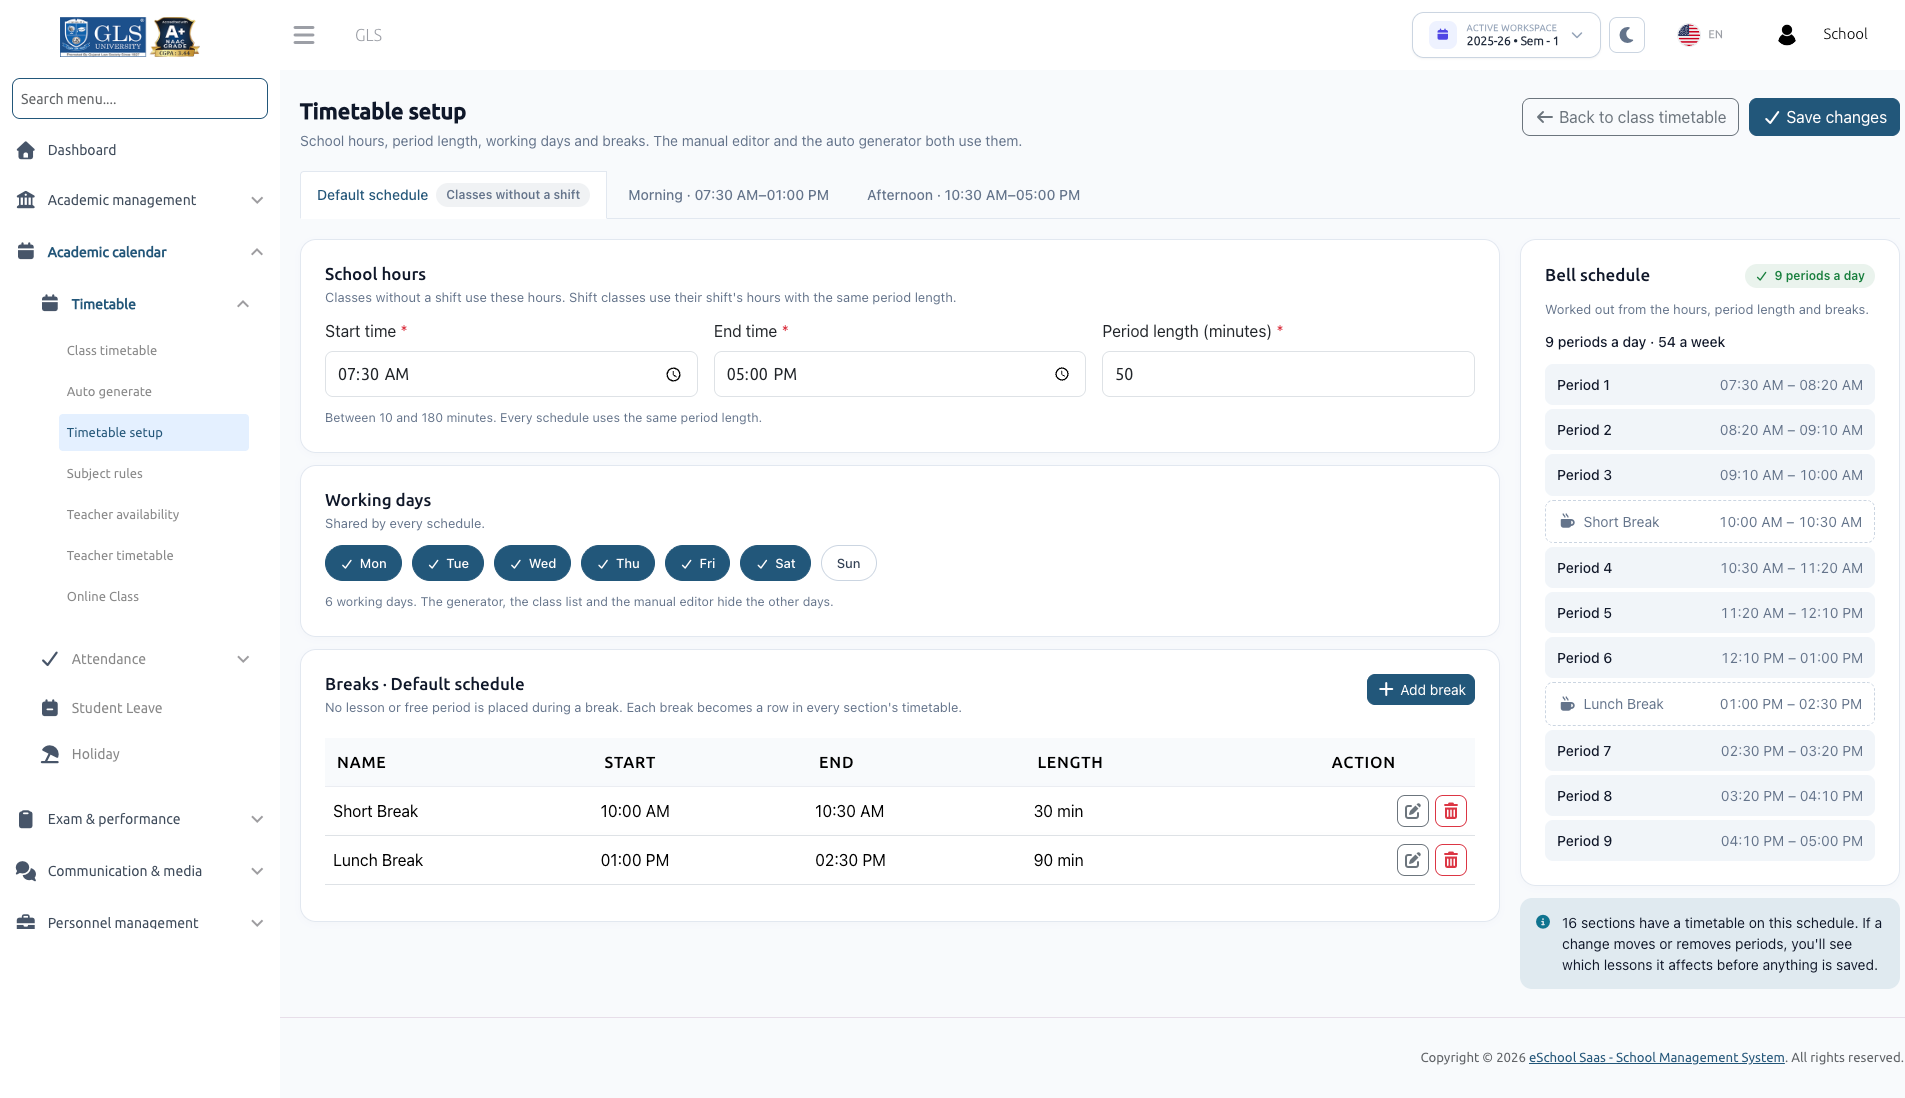
Timetable setup defines the fundamental parameters of your school day: starting and ending hours, period length, working days, and scheduled breaks. Both the manual timetable editor and the auto timetable generator strictly adhere to these settings.
To access Timetable Setup, your user role must have the timetable-create permission. Ensure you are working in the correct active Session Year and Semester selected in the top workspace selector.
1. Overview & Schedule Tabs
Navigate to Academic calendar → Timetable → Timetable setup.
The page is organized into schedule tabs:
- Default schedule (Classes without a shift): Defines the primary schedule for standard classes not tied to any specific shift. Here, school administrators directly configure the Start time and End time.
- Shift Tabs (e.g., Morning, Afternoon): If your school uses shifts (configured under Academics → Shift), each active shift displays its own dedicated tab with its specific start and end hours.
- On shift tabs, Start time and End time are read-only and inherited from the Shift settings page.
- An Edit shift hours shortcut link is provided if you have permissions to manage shifts.
- A class assigned to a shift automatically uses that shift's bell schedule and break times.
Shared Schedule Settings
The following parameters are globally shared across all schedules:
- Period length (minutes): Must be a whole number between 10 and 180 minutes. Every class period across all schedules follows this duration.
- Working days: Shared across all schedules. Click any day button (Mon through Sun) to toggle it on or off. At least one working day is required.
Until saved, the working days are automatically suggested based on your school's Leave settings (e.g., if Sunday is marked as weekly off, Monday to Saturday is suggested). Click Save changes to confirm your working days.
2. Managing Breaks
A break is a scheduled pause during the school day where neither lessons nor free periods can be scheduled. Each break is automatically represented as a dedicated row in every class section's timetable on every working day.
Adding a Break
- Configure and save the school hours and period length first.
- Click Add break.
- Fill in the required fields:
- Break name: E.g., "Lunch break", "Morning Snack", "Recess".
- Start time: E.g.,
10:40. - End time: E.g.,
11:00.
- Click Save break.
Break Table & Actions
All scheduled breaks are listed in a table with the following details:
- Name: Name of the break.
- Start: Beginning time.
- End: Ending time.
- Length: Calculated duration in minutes.
- Action: Edit (pencil icon) or Delete (trash icon).
If a break starts in the middle of an ongoing lecture period, the setup page warns you:
"Starts inside period 4 (10:00–10:40). 20 minutes before the break would be unused."
The system will suggest an adjusted start time that aligns neatly with period boundaries so that zero minutes are wasted.
3. Real-Time Bell Schedule
The Bell schedule panel on the right calculates and displays the resulting daily timetable structure in real time based on your configured hours, period length, and breaks:
- Slot Count: Displays total periods per day and weekly slots (e.g., "7 periods a day · 42 slots a week").
- Status Indicators:
- Unsaved changes: Indicates modified settings that have not yet been saved.
- Needs fixing: Warns if the configured hours and period length cannot fit at least one complete period into the day.
Example Bell Schedule Structure
| Period | Time | Type |
|---|---|---|
| Period 1 | 08:00 – 08:40 | Lesson Slot |
| Period 2 | 08:40 – 09:20 | Lesson Slot |
| Period 3 | 09:20 – 10:00 | Lesson Slot |
| Period 4 | 10:00 – 10:40 | Lesson Slot |
| Lunch Break | 10:40 – 11:00 | School Break |
| Period 5 | 11:00 – 11:40 | Lesson Slot |
| Period 6 | 11:40 – 12:20 | Lesson Slot |
| Period 7 | 12:20 – 13:00 | Lesson Slot |
4. Saving Changes Affecting Existing Timetables
If your edits change the timing or number of periods such that existing live timetables or drafts would be impacted:
- A confirmation modal titled "This change affects existing timetables" appears.
- It lists all affected class sections and lessons that will fall out of alignment or into conflict.
- It informs you how many open auto-generated drafts were generated using the old bell schedule and will need to be regenerated.
- Select Save anyway only if you are ready to adjust or regenerate those timetables.
Next Steps
After completing Timetable Setup, proceed to define weekly subject quotas and limits in Subject Rules.